Monday, April 11, 2011

Generating an inline schema in JDeveloper

A question that comes up now and then is how to generate a WSDL with the Schema in-line rather than as a separate file. This is required for certain mobile platforms and in particular Siebel Tools. This feature wasn't added to the JAX-WS RI until version 2.2.1 which is ahead of the version use in JDeveloper. It is possible to get some integration using the external tools command to make use of a later version of this tool in JDeveloper.

To get this to work you first need to download JAX-WS RI 2.2.1 or later. The configuration is similar to what we have used previously on this blog with a few specific modifications.

The program executable is simply the location of the wsgen.sh or wsget.bat file that comes with the RI download. The second line is more complicated:

-Xendorsed -d ${project.outputdirectory} -s ${project.outputdirectory} -cp ${project.outputdirectory};${project.classpath} ${target.class} -r ${file.dir} -wsdl  -inlineSchemas

Reading left to right we are: making sure we used the endorsed property to use the updated API; specifying the project classes directory for any output; specifying the project classpath; the class name from the current selection; where the wsdl file should be written out, the same one as the java file; and finally that we want to generate a wsdl and that it should be inline.

In the rest of the wizard you are likely to want to configure the tool to appear in the navigator and only appear for java source files. All pretty vanilla stuff. Once this is configured you should have a menu item you can invoke from the JDeveloper UI. After you invoke this action if you didn't check re-load external tools in the wizard you need to press the refresh button to see any changes.

There is one remaining manual step and that is to associate the wsdl with the source file, to do this you simply need to update the wsdlLocation attribute:

package webservice;

import javax.jws.WebService;

@WebService(wsdlLocation = "/webservice/HelloService.wsdl")
public class Hello {
    public String hello(String name) {
        return "";
    }
}

This will now deploy with the new compact all in one wsdl document. JDeveloper will notice you have a file and tell you if the files get out of sync; but you will of course need to use your external tool command otherwise you will loose your in-line schema.

Friday, September 3, 2010

Getting more out of your debugger with remote options

Introduction
I bet day to day most people use the built in direct debugger in your IDE. You press a button and everything is done for you. This won't help you if the start up configuration is non trivial, in the case of weblogic for example where you have to run a script, or the process has to run on another machine. In the remote section there are a number of options that are pretty interesting as far as dealing with certain corner cases. I had cause to use some of them recently to track down a particularly hard to reproduce bug and realized that some are actually applicable to day to day work.

All the screen grabs are from JDeveloper; but the concepts should work equally well with other tools.

Normal remote debugging.

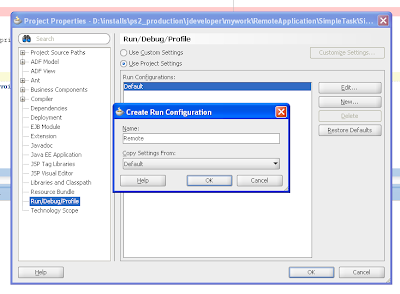
JDeveloper at least doesn't come with a remote run profile configured by default but it is really quick to set one up from the project properties dialog. In the Run/Debug/Profile configuration page create a new entry:


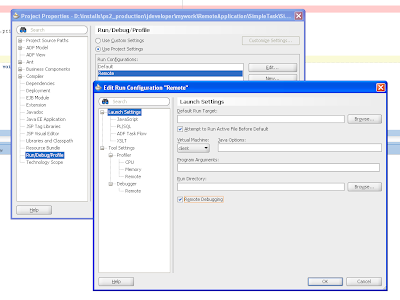
Then edit the properties so that JDeveloper knows you are doing remote debugging:


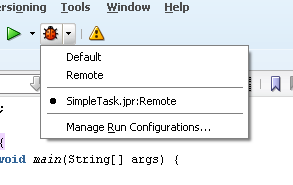
Then you can select this profile to debug:


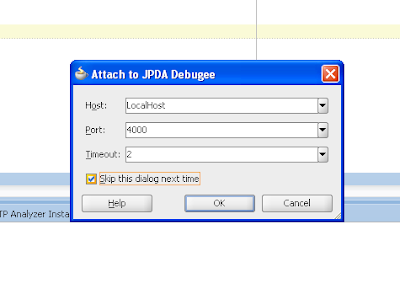
The first time the debugger runs you will see this connect dialog, for most local debugging work the settings can stay the same so check the box so you don't get asked each time. You might want to consider increasing the timeout a little bit for convenience.


So you need to run your java process with the, erm, simple command line option as follows. Not the easiest to remember string; but I guess "alias" is your friend.
java -agentlib:jdwp=transport=dt_socket,server=y,address=4000 ...

Right so that is the basics, lets try some of the more interesting options.

Start and connect later

In the default mode for the debugger the debuggee process won't start until until the IDE tells it to, and will quit when the debugger stops. This is really annoying if you are trying to debug a remote instance of weblogic server and want to keep it running between sessions. (For example if you configured another server to use instead of the integrated one, I am looking at you Chris Muir) Or if you forget to start the debugger and everything is just sitting there waiting for you to wake up.

So you can use the "suspend=n" flag, this means that the target task will start; but allow you to connect a debugger later:

java -agentlib:jdwp=transport=dt_socket,server=y,address=4000,suspend=n ...

You run the remote debugger in the normal way; but when you "Stop" the debugger you now have a choice to either let the process continue running or to kill it:


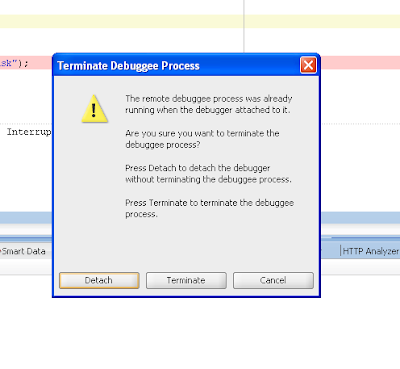
This allows you to leave infrastructure running, most like a server, whilst still be able to connect on demand to debug.

Have debugger always running, get the debuggee to connect back

The previous two configurations both require at least two step processes for each debugging session. You have to start the debugger and debuggee. This can be really annoying particularly if you are trying to debug a hard to reproduce problem that requires the target VM to be stopped and started many times.
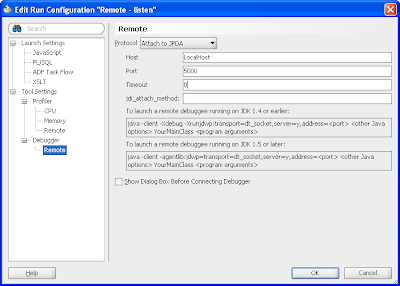
Luckily there is a setting that allows the debuggee to connect to the debugger at start up. The debugger on the IDE only needs to be started once to listen for events. This takes a bit more to set up so lets start at the IDE end and create a new Run/Debug/Remote entry:


In the properties for "Remote - listener" change to be a JPDA listener rather than the normal attach mode:


Also set the timeout to zero so it listens for-ever and use a different port so that it won't clash with normal debug sessions. (Minor mistake in screen grab, the combobox is showing the wrong value use the value in the previous grab)


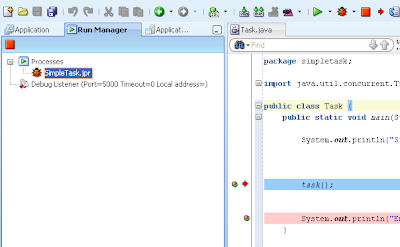
Now you just have to run this profile in the normal way, and instead of the debugger starting you should see this listener active in the Run Manager.


So the next step to to run the task you want to debug notice the server flag has changed and we have specified the new port:

java -agentlib:jdwp=transport=dt_socket,address=localhost:5000,server=n ...

In JDeveloper the debugger will start up and then run in the normal way:


You can start multiple sessions at the same time with difference instances of the program you are trying to debug. It can get kind confusing though. It does mean that starting the debuggee is a one step process which seems to save me some vital thinking seconds that I could be applied to the problem in hand.

At some point you may wish to shut down the listener, for completeness you can do this from the run manager:


This is the mode that I am finding a valuable time saver day to day. It might only save a few seconds on each run; but over the last week it has proven to be a real time saver. Of course this is very dependent on just what and how you are debugging on whether you will find this useful.

More details

For more details on the debugging options that a look a this sun Oracle document. There are other options such as in memory transports and starting a debugger on an exception that are worth looking at.

Thursday, August 19, 2010

Can you see the problem with this code?

Just a little code quiz, can you spot the design problem with this API? Bonus points for come up with a plausible reason as to what the programmer was distracted with whilst working on this.

    /** Load an integer from system properties, validating in a range */
    public static int getProperty(String name, int defValue, int min, int max){
        try {
            int value = Integer.getInteger(name, defValue).intValue();
            return Math.max(min, Math.min(max, value));
        }
        catch(NumberFormatException e) {
            return defValue;
        }
    }
    /** Load an long from system properties, validating in a range */
    public static long getProperty(String name, long min, long max, long defValue){
        try {
            long value = Long.getLong(name, defValue).longValue();
            return Math.max(min, Math.min(max, value));
        }
        catch(NumberFormatException e) {
            return defValue;
        }
    }

Friday, April 30, 2010

Hello World using the Weblogic SCA support in JDeveloper 11.1.1.3.0

This is just a brief introduction to the newly added Weblogic SCA support that we have in the latest release of JDeveloper. Weblogic SCA allows you to take POJO classes and expose them as Web Services or EJB externally and use Spring internally to connect services together. You can find more on WebLogic SCA in the primary documentation.

Before we get going you are going to need to download the "Spring & Oracle WebLogic SCA" extension for JDeveloper as we don't ship it with the product. So as per normal Help->Check for Updates and select the matching extension:

Once this is installed and JDeveloper has restarted we need to perform an extra step to install the Weblogic SCA extension in the copy of WebLogic that comes with JDeveloper. In the context of a project select Run -> Start Server Instance. Then on the WebLogic console, "http://localhost:7101/console", navigate to "Deployment" then select the "Install" action. You can find the shared library you need to install under %INSTALL_HOME%/wlserver_10.3/common/deployable-libraries/weblogic-sca-1.1.war.

You need to just accept the defaults in the wizard and once finished we are almost ready to start writing code. If your are interested in taking this a little bit further you should go to Preferences -> Extensions and enable the weblogic-sca and spring extension that provide extra monitoring capabilities. These require a server restart to fully enable.

Heading back to JDeveloper now we are going to create a new project and then configure that project for as a Weblogic SCA project that is going to be deployed as a war file. (See documentation for more on deployment options).

This will give you an empty web.xml, an empty spring-context.xml and a weblogic.xml that sets up the dependency on the WebLogic SCA library. The final file looks a lot like this, in a more complicate environment you might need to specify the library version.

<?xml version = '1.0' encoding = 'windows-1252'?>
<weblogic-web-app xmlns:xsi="http://www.w3.org/2001/XMLSchema-instance" xsi:schemaLocation="http://www.bea.com/ns/weblogic/weblogic-web-app http://www.bea.com/ns/weblogic/weblogic-web-app/1.0/weblogic-web-app.xsd" xmlns="http://www.bea.com/ns/weblogic/weblogic-web-app">
    <library-ref>
        <library-name>weblogic-sca</library-name>
    </library-ref>
</weblogic-web-app>

We are going to create a few java classes to illustrate not just the publishing of a POJO as a service but also the wiring up of internal components using Spring. First lets define the service, you need a class and interface for SCA:


// Interface

package hello;

public interface Hello {
    
    public String sayHello(String name, String langauge);
    
}

// Implementation

package hello;

import translation.Translator;

public class HelloImpl implements Hello {
    
    private Translator _translator;
    
    public void setTranslator(Translator t) {
        _translator = t;
    }
    
    public String sayHello(String name, String langauge) {
        String message = "Hello " + name;
        return _translator.translate(message, langauge);
    }
    
    
}

For the purposes of the demo we are going to have to provide this Translator interface along with an dummy implementation again in separate files. The implementation could be from a JAX-WS proxy; but this is wired up in a different way from what we are showing today.


package translation;

public interface Translator {
    
    public String translate(String text, String langauge) ;
    
}

// Dummy Implementation

package translation;

public class DummyTranslator implements Translator {

    public String translate(String text, String langauge) {
        if ("fr".equals(langauge)) {
            return text.replace("Hello", "Salut! ");
        }
        else if ("de".equals(langauge)) {
            return text.replace("Hello", "Guten Tag");
        }
        else {
           return "DT " + langauge + " " + text;
        }
    }
}

So we are going to need two entries in spring-context.xml, the first is to wire the dummy translator up to HelloImpl:

  <bean id="translator" class="translation.DummyTranslator" />
  <bean id="hello" class="hello.HelloImpl">
     <property name="translator" ref="translator" />
  </bean>

One difference you might notice from the previous spring extensions is that the bean names and class names are now connected up to the Refactoring framework. So you can "Rename", "Find Usages" and "Go to Declaration" on most of the entries in this file.

The next entry in this file exposes the HelloImp as a web service using the binding.ws elements. So the final spring-context.xml becomes:

<?xml version="1.0" encoding="windows-1252" ?>
<beans xmlns="http://www.springframework.org/schema/beans"
       xmlns:util="http://www.springframework.org/schema/util"
       xmlns:jee="http://www.springframework.org/schema/jee"
       xmlns:lang="http://www.springframework.org/schema/lang"
       xmlns:aop="http://www.springframework.org/schema/aop"
       xmlns:tx="http://www.springframework.org/schema/tx"
       xmlns:sca="http://xmlns.oracle.com/weblogic/weblogic-sca"
       xmlns:xsi="http://www.w3.org/2001/XMLSchema-instance"
       xsi:schemaLocation="http://www.springframework.org/schema/beans http://www.springframework.org/schema/beans/spring-beans-2.5.xsd http://www.springframework.org/schema/util http://www.springframework.org/schema/util/spring-util-2.5.xsd http://www.springframework.org/schema/aop http://www.springframework.org/schema/aop/spring-aop-2.5.xsd http://www.springframework.org/schema/jee http://www.springframework.org/schema/jee/spring-jee-2.5.xsd http://www.springframework.org/schema/lang http://www.springframework.org/schema/lang/spring-lang-2.5.xsd http://www.springframework.org/schema/tx http://www.springframework.org/schema/tx/spring-tx-2.5.xsd http://www.springframework.org/schema/tool http://www.springframework.org/schema/tool/spring-tool-2.5.xsd http://xmlns.oracle.com/weblogic/weblogic-sca META-INF/weblogic-sca.xsd">
  <!--Spring Bean definitions go here-->
  
  <bean id="translator" class="translation.DummyTranslator" />
  <bean id="hello" class="hello.HelloImpl">
     <property name="translator" ref="translator" />
  </bean>
  
  <!--Service definitions -->
  
  <sca:service name="helloService" target="hello" type="hello.Hello">
    <binding.ws xmlns="http://xmlns.oracle.com/weblogic/weblogic-sca-binding"
                port="hello" uri="/hello" soapVersion="1.1" name="hello"
                location="HelloLocation"/>
  </sca:service>
  
  
</beans>

So you can right click and "Run" spring-context.xml and everything gets deployed to the local application server. The easiest way to test the service is View -> Application Server Navigator and then select the deploy service from the "Web Services" node.

And then you will see the test page for this service, just a quick overview but enough to get starting with this new area of functionality. Note that unlike full SOA this feature is part of the standard WebLogic license. Also that if you have SOA tooling installed you will see more integration with tools such as the composite editor which "knows" about Spring SCA beans.

Thursday, April 15, 2010

ADF/JSF Invoking a method on a backing bean before the page is shown

In a couple of cases in our application we really needed to run a little section of code before the page was displayed. We tried a bunch of ways of doing this until we got a tip from Ducan Mills that we could consider abusing "Bookmark" feature in adfc-config.xml. This is normally just for accepting query parameters; but it turns out that the method is executed before the page is rendered so it can be useful it you need to do some minor configuration in advance.

Note that this only applies to unbounded task flows, bounded task flows can't be made book markable. Also the parameters are optional, the code will fire even if none are defined as they are in this example. (We are using the code to force some initial selections in this case.)

I am not convinced it is a good idea in many cases; it was really helpful in solve our particular problem. I would be interested to hear if there is a more JSF way of doing this.

Forgotten JDeveloper feature : The bytecode debugger

I am pretty lucky in my day to day work that I have access to nearly all of the source code for the software I work with. (Even the close hold Java security code which is very useful when working on the HTTP Analyzer). Sometimes you run across a snippet of code that for whatever reason you don't have the source code to hand. JDeveloper will generate you a stub; but that is not so useful when you want to know what is going on.

There is a kind-of hidden feature in JDeveloper called the bytecode debugger that you can enable by selecting "Show Bytecode":

This will show you the method in question in terms of bytecodes, and you can use the new extra pink toolbar icons to step at the bytecode level or just use the normal ones to step in at the java method level.

Very useful when you are stuck and for very good legal reasons cannot make use of java dissembly tools.

Wednesday, April 14, 2010

Making OTN documents more readible

There is a lot of good information on OTN; but I like a certain subset of other people find the color scheme hard to read. For example I find the this page by Steve really hard to read because of the large amount of bold text:

To me I can only focus on the bold text and the rest just kind of swims around. This might be because I might be slightly dyslexic, never confirmed, or just my eyes are tired this week. Either way it means I have to print everything on OTN in order to be able to read it.

The author of this page suggested I hack the .css using firebug; but I wanted a more automatic option so after discarding GreaseMonkey and being too much hassle for this work I settled on a addon called Stylish. This simply allows you to override .css settings for particular websites. Once installed, and restarted, you invoke it from the icon that gets installed at the bottom left of Firefox window:

You can then play with the .css to you hearts content using the style editor dialog:

The style I am using removes a lot of the bold text and gives me a nice yellow background color this I find easier to read on. I would be interested to see what other people choose, I know there have been some moans about the new red/black color scheme on dev.java.net.

@namespace url(http://www.w3.org/1999/xhtml);

@-moz-document domain("www.oracle.com") {


.boldbodycopy {font-family: Arial, Helvetica, sans-serif; font-size: 12px; line-height: 14px; font-weight: normal !important; color: #000000 ; text-decoration: none; }

.boldbodycopy2 {font-family: Arial, Helvetica, sans-serif; font-size: 12px; line-height: 14px; font-weight: normal !important; color: #999999 ; text-decoration: none; }

.boldbodycopy3 {font-family: Arial, Helvetica, sans-serif; font-size: 12px; line-height: 14px; font-weight: normal !important; color: #666666 ; text-decoration: none; }

html, body {
  background: none !important;
  background: #ffffcc !important;
}

}

It seems that you have to use the "!important" modifier in order for the changes to really work. Here is what the text in the original document looks like after these changes: